


Apple’s worst ever design: how is this even possible?
![How to get snapchat on apple watch? [7 Easy Steps to Follow]](https://writaway.com/wp-content/uploads/2021/07/Copy-of-Get-Snapchat-on-your-Apple-Watch-1.png)
How to get snapchat on apple watch? [7 Easy Steps to Follow]
Got an apple watch? What’s more, tempted to get Snapchat on the Apple watch but can’t? Go through this guide and know how to manage Snapchat on the Apple watch.
Apple wearables have been well known universally for their exceptional features and abilities, making them their sort of smartwatch. Apple continues adding new highlights and easing the UI and the current features by launching updates to accomplish more precision.
Read the full report to learn how to get Snapchat on Apple Watch and other features you get in Snapchat on Apple Watch.
Can you get Snapchat on Apple watch?
Sadly, no. It is not accessible to use Snapchat on the Apple Watch. To know about this visit:- Apple support.
The reason is that the Snapchat application, built for the iPhone’s iOS, does not work correctly with the Apple Watch’s WatchOS programming.
However, many application developers have then again delivered Watch OS applications for WhatsApp, Twitter, and Instagram. However, they are yet to develop a costless or charged application service for Snapchat on Apple Watch.
The valid explanation for this is that Apple Watches don’t possess an in-built camera. But Snapchat demands access to the camera on the installed device to share photographs with your friends or companions.
Reasons, all things considered, you may address why somewhere around a Lite version with limited abilities for Snapchat can’t be launched on Apple Watch?
Nevertheless, there is an uncomplicated method, free to apply to resolve this issue. I will discuss with you the strategy for how to get Snapchat on Apple Watch. Yet, it is Snapchat with some limited capabilities. Refer to the guide underneath.
Also read: How to Transfer Files from Google Drive to OneDrive?
7 Simple steps to operate snapchat on apple watch:
Step 1: Make sure your Apple Watch is using your mobile internet.
Step2: Press or tap on the Siri button on the watch, operate Siri on your Apple Watch. Now hit and keeping pressing the “Digital Crown” till you notice the “listening pointer.”
Step3: Give the command for a “Google Search”
Note: Siri on both Watch OS 6 and Watch OS 7 cannot deliver many queries on the web for general inquiries.
Step 4: Now give the command to access “Google.com”
Step 5: Scroll over the found results and touch on “Open Page.”
It will now re-direct you to Google’s Homepage.
Next, look up ‘Snapchat online’ on Google, or use your mic to get the results on the screen.
Step6: Press and choose the “Log in Snapchat” option in the searched items.
Once you pick this choice, you will be re-directed to the Snapchat Login webpage. Now, insert your details (username and password) to enter your Snapchat account. “Make sure to choose a password that contains both upper-case and lower-case letters and a mixture of numbers and signs. It helps you to protect your privacy.”
Typing on an apple watch becomes kind of a hectic task to do, so if you need to log in to your Snapchat app quickly, you can choose the alternative mentioned below.
Alternative
Step 7: Tap and select Snapchat from the list items. On the upper right corner of the watch screen, you’ll now be able to see the three dots; tap on it. Then, click on Stories.
In this way, you’ll be able to see a few group’s Snapchat stories. For the most part, it’s stars snaps. You can even utilize the Map option using this method. Moreover, you can use the Search symbol to look through accounts of individuals by name.
Conclusion:
Technology has made our lives going easy, but there’s always something that you can explore by yourself. As in this article, we walked you through a piece of basic but essential information about how to get Snapchat on the Apple watch. For some, they might have already figured it out, but for those who are still in the dilemma, the answer is right in front of you. Test this technique on your own and share it with more people if it works for you. Feel free to ask more questions about it in the comment section.
If you have any queries related to this topic feel free to contact us.

How to Transfer Files from Google Drive to OneDrive for Business? Top 3 Ways Explained
Summary: The article provides insight into the user query, i.e., “how to transfer files from Google Drive to OneDrive for business?” Follow along with step by step guide to perform this operation using three different techniques.
The days of coming into the workplace to obtain corporate information are long gone. Remote work has permeated businesses worldwide, and employees are becoming more productive whether they are in the office or on the move.
The aforementioned has been made feasible by storing files on the cloud. However, the reality of work from anywhere is pushing companies to provide information to their users in real-time, respond to requests promptly, and safeguard critical content.
We don’t usually keep track of how many files are synchronized on Google Drive or uploaded daily.
We all initially picked Google Drive due to its handy features and user-friendly interface. However, as our demands grow and our work becomes more complex, we gravitate toward OneDrive for Business.
Why should businesses and consumers favor Microsoft OneDrive over Google Drive?
1- Integration with Office 365 is seamless.
2- Over 270 file types and 100 languages are supported.
3- It is the most affordable cloud storage available
4- Azure Information Protection provides secure encryption.
5- OneDrive makes it simple to collaborate with other users.
6- It has excellent security measures and a solid infrastructure.
7- Microsoft OneDrive allows access to files from anywhere and at any time.
Techniques to Transfer Files from Google Drive to OneDrive for Business?
Approach 1: Use Google Takeout to move Your Google Drive files To OneDrive.
Visit the Google Takeout page and enter your Google Account credentials.

Choose the “Data and Personalization” option, then click on the Download Data option.

Press deselect all tab to deselect all.

Select the Drive option to take the backup of it.

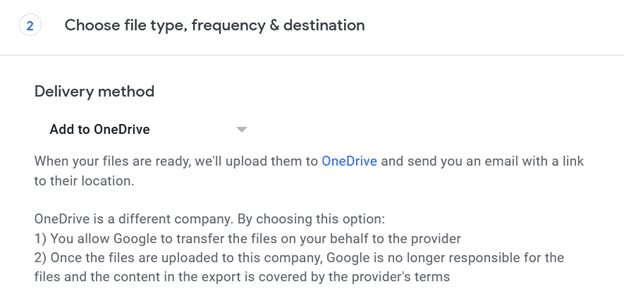
For the selected items, choose the file type, frequency, and destination. Under destination, choose to Add to OneDrive.
Then, to begin the downloading process, press the Create Archive tab.

After the downloading, press the Save button to save the Google Drive files in OneDrive.
Limitations of the Method:-
1- If internet access is lost, the transfer will stop and cannot be resumed. You’ll have to start from scratch.
2- Folders shared with you in Drive cannot be exported using Google Takeout, even if they include files generated by you.
3- While exporting large files or folders, incomplete downloads may occur.
4- Even when utilizing the.tgz format, an archive’s daily download restriction is 50 GB per day.
Approach 2: Easiest Way to Migrate Google Drive Files to OneDrive (Suggested)
The Google Drive to OneDrive Migration tool is a trustworthy and straightforward option for efficiently transferring files from Google Drive to OneDrive. Moreover, the tool lets you migrate any number of users from Google Drive to OneDrive, allowing you to prioritize users while transferring.
Various file types supported by the tool are PDF, .txt, .jpeg, and MP3. It also maintains the folder hierarchy after all the files migrated from Google Drive to OneDrive for business. Additionally, the software can transfer any form of material, including documents, text files, PDFs, Excel workbooks, and ZIP archives.
Read the given steps to know more about the tool:
Step 1: Download and activate the software in your system.
Step 2: Next, select the Source as G Suite and Destination as Office 365 platforms in the software panel.

Step 3: Enter Administrator Email and Service Account details, and upload the certificate file. After validating, click on the Next button to transfer files from Google Drive to OneDrive for business.

Step 4: Afterwards, go to the Destination option and enter the Admin Email and Application ID. Click on the Next tab.

Step 5: Go to the User screen and Add users and authenticate them.

Step 6: Set priority if you want to migrate data based on it, and then click on the Start Migration button to migrate files from Google Drive to OneDrive for business.

Also read:- Move OneDrive Files
Approach 3: The Download and Upload Method to transfer Google Drive Files to OneDrive
The easiest way to migrate Google Drive files to OneDrive is to download the files from Google Drive to your PC and then upload them to OneDrive.
- To download files from Google Drive, utilize Google Takeout or the Google Drive Downloading Option.

- Now, upload these files to the OneDrive cloud storage platform.
Drawbacks of This Method:
a- If you utilize Google Takeout to download your Google Drive data, you will not download the files under the section ‘shared with you in Google Drive.
b- You’ll need a lot of space on your desktop to retain a copy of your Google Drive account before uploading it on OneDrive.
c- The download and upload operations can take some time.
d- There should be no internet or power interruptions; otherwise, you will have to start all over again.
Concluding Words
Many customers have shifted away from Google Drive in favor of OneDrive due to its superior features. The aforementioned necessitates the transfer of Google Drive files to OneDrive.
As a result, we have covered all of the ways a user can utilize to transfer files in this article. Conclusively, the manual tools limit the user’s ability to move files in many places—the experts’ advice is to use an automated application to transfer files from Google Drive to OneDrive.