Plot Summary: This article describes the most effective and reliable approach to transfer/migrate Office 365 mailbox to another user without any technicality. If you have the same query, you will get a beneficial solution by the end of this article.
But first, we will take a look at the user query to understand the complications they are facing while doing the same operation.
User Query:
Scenario:
Data migration can arise quite often due to various reasons such as business merger situation, consolidation, acquisition employee discontinuation, etc. As there, not any reliable approach available for data migration in Office 365.
The Manual Way to Transfer/Migrate Office 365 Mailbox to Another User & Its Limitations:
As mentioned in the user query, the user tries to migrate by ruining the PowerShell cmdlet scripts and getting multiple errors. The conventional way to perform data migration is a tedious task for its users, and even IT admins face many challenges while running these scripts.
The user must have the technicality, and he should know PowerShell and Office 365. Otherwise, a minor error in these scripts can result in multiple mistakes and create potential data loss. Moreover, it can hamper the running business by creating a temporary communication halt.
It becomes a tedious task to perform in this way, and users have to face many complications. The manual method is very technical and complicated for nontechnical or novice users to follow.
Now, let’s discuss the most effective and secure way to perform this data transfer without any technicality.
Reliable & Secure Approach on How to Move Office 365 Mailbox to Another User
The most effective way to perform any data transfer operation in Office 365 is to use professional automated software. This method can easily automate all the technical steps into a simple process.
Therefore, we suggest Office 365 to Office 365 Migration Tool. This tool is the most efficient and reliable software available today to securely carry out various types of data migration in Office 365. It maintains 100% data structure and integrity throughout the process and provides its user a seamless data transfer experience.
Users can try this utility for free before purchasing the full versions by availing themselves of a free demo version of this utility. The demo version can migrate two user accounts data to another for free.
Software Steps to Migrate from One Office 365 Account to another Account
Just go through these simple steps to perform this technical operation without any complication with the help of this utility.
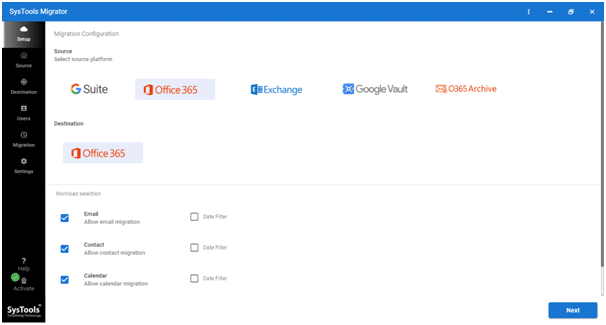
Step 1: Download and install to run this utility, now you have to choose the migration platform. And to do this, you have to opt for Office 365 as the source and the destination platform.
Step 2: Now, choose all the required mailbox item categories such as email, contact, calendar, and documents by just checking the box given in front of it from the workload selection. Now, proceed with the next step to transfer/migrate the Office 365 mailbox to another user.
Innovative Facility: This excellent utility offers an intelligent way to migrate Office 365 mailbox data selectively by applying a date-based filter. Use this filter if required by selecting the date range from the workload selection.
Step 3: Here, you have to use your source Office 365 admin account credentials to log in to this portal, use admin ID and application ID and click on the validate button. After this, log in using the destination admin account credentials and validate it by following the last step. Then, hit the following button to transfer/move Office 365 mailbox to another user.
Step 4: This utility also offers an option to create group mapping between the source and the destination tenants. You can make the same, and in order, you can have three options: Import Users, Fetch Users, and Download Template.
Step 5: Choose accordingly and create a user mapping. Now, hit the Validate button to validate required permissions.
Step 6: In this last step, you need to hit the Start Migration button to transfer/migrate Office 365 mailbox to another user safely.
In Short
By going through many Office 365 user’s queries on “how to move Office 365 mailbox to another user?” We have come up with this article. We have discussed the most secure approach to overcome the technical manual system by using the automated solution.
Hence, by utilizing this tool, as mentioned earlier, one can easily migrate Office 365 to another account. While keeping 100% data protection and integrity throughout the process.
Many users may want to export all files from OneDrive to PC, move them to another email service or keep them safe from external threats. Either way, you need to perform a successful migration in bulk without any casualties.
It is a known fact that OneDrive offers 5GB of free storage space to save files and documents. You can extend OneDrive’s space limit by paying a certain amount or purchasing a specific plan. But for those who do not want to spend on buying extra space can bulk move files from OneDrive.
The question arises: How to export these files in bulk without any data loss?
It is, in fact, not as difficult a task as it may seem if performed using the perfect technique and a reliable solution. You may find several methods and workarounds to perform this task, but this blog consists of only the best of them.
Microsoft itself offers an option to save the data in bulk which we will be discussing here. Let’s take a look at the first method.
Suitable Technique to Export All Files from OneDrive to PC
As users need to take a backup of their data for safety reasons, it is also necessary to use the right solution. Here, you will find the only method capable of exporting the files in Outlook data file and saving them on any desired location on the local device.
For this, you can download the OneDrive Backup Tool that is capable of downloading all the data from your OneDrive account. And, save it locally as an Outlook supported file, i.e., PST.
There are various features you can use to bulk download files from OneDrive utilizing this tool as mentioned below:
Save files in bulk locally only in one shot
Date-filter option to export selective files
Option to export data in batch mode via Concurrent Backup
Download files without changing the folder hierarchy after backup
Real-time status of the export report displayed on the screen
Export newly arrived files only using the Delta Backup option
Compatible with Windows OS 10 (64-bit) and Windows Servers 2012 & 2016
As seen above the features of this tool, let’s how it works.
What Are the Steps to Perform Backup Operation Using the Wizard?
You can export all files from OneDrive to PC by following the given steps:
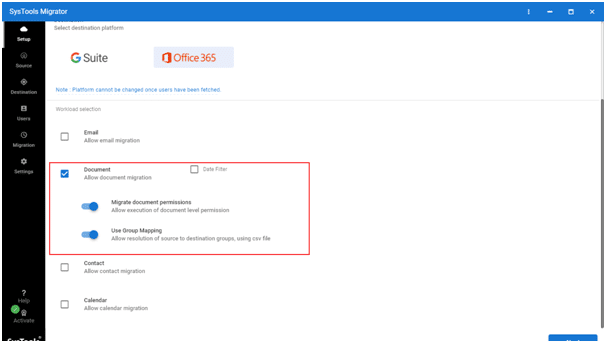
After downloading the tool, choose the Backup option and set the Source and Destination in the Setup tab.
Mark the required category, i.e., Documents, in the Workload Selection fields and apply the Date-Filters for selective data exportation.
Here, enter the Admin Email & Application ID in the Source – Office 365 window. Hit Validate and click on the Next button.
Choose the Backup Folder path and Size of the file in the Destination – Outlook window. Click on the Validate button and press Next.
Now, to bulk download files from OneDrive, choose the option to add user IDs. We choose the Fetch Users option here.
Finally, Validate the user IDs and tap on the Start Backup button to complete the process.
You can find all the files in a PST format on the chosen path and selected file size. Other than that, in case you want to rerun the entire backup task, you can select the Rerun Backup option.
Also, if you want to take a backup of the files you receive after the first procedure. You can download only the new files by using the Delta Backup feature.
Manual Method to Export All Files from OneDrive to Computer
As discussed before, Microsoft can save all the files locally from the web-based OneDrive service. We will explain the steps to download all or selective files. Besides, a few things to be kept in mind before performing this task.
Let’s first take a look at the steps:
Go to the OneDrive server on Office 365 or Microsoft 365 website. Choose the files or folders you want to export.
You can select each item if you want to save individual or multiples files if you want to bulk download files from OneDrive. Or mark the first file you want to export, scroll to the end file, press Shift, and click on it simultaneously.
You also have the option to select all the files in a folder by pressing Ctrl + A.
It is also possible to choose an entire folder by going back to a level.
After selecting the files you require and however you need, click on the Download button to export all files from OneDrive to PC.
A .zip file is downloaded, and the process to export all files from OneDrive completes here. Although, there are certain things you need to keep in mind that are brought to attention by Microsoft. Find them as followed:
A post on Microsoft’s support website states a few facts about what can or can’t be downloaded using the manual method.
If you are prompted with an option: Save or Save as, navigate to the desired destination location and select the path for the result.
In Brief
Users can find various methods and reasons for which they may want to export all files from OneDrive, but the leading cause is backup. It is essential to keep a backup of your data of any kind for safekeeping from the threats such as data loss.
The techniques explained here are practical, but there are a few keynotes to keep in mind before performing the task manually. As for the software, there is only a need to install the Outlook application for Desktop, and you are good to go.
(SSD) solid state disk shows an essential role in every computers’ life. Users like it because of its efficiency and advanced functionalities. Despite its advantages, it consists of few serious disadvantages also due to which sometimes users confront several unknown error messages while working with a laptop or computer. One such error message is ‘Format the drive.’ These errors force users to format their SSD drives, and in few cases, users format their SSD intentionally, resulting in permanent data loss. Keep this problem in mind, and I have come up with this write-up. Here, I will unwrap few superior approaches to resolve how to recover formatted data from computer issues in an efficient manner. So, let’s get started.
What Occur to Formatted Solid State Drive?
Once a user formats their SSD so, all the data files are marked as deleted files. Primarily, those become invisible from SSD and waiting to be overwritten with new data. So, when you erroneously or by choice format the solid-state disk, consequent in loss of vital data. In this situation, users can use any trusted recovery method to recover formatted data from SSD before new data overwritten that permanently.
Recover Formatted Data From Computer With Reliable Solution
Restore data after formatting the solid-state drive is not a myth it is possible. But, there is no free solution for the same. To do so, I come up with an expeditious method named SSD Recovery software. This application comes under the world’s best three recovery applications. Using this software, users can recover formatted, corrupted, and permanently deleted data from the laptop.
Primarily, it facilitates enhanced features to give a secure and perfect formatted data recovery process. Furthermore, this fantastic utility comes with two versions one is the demo version, and another one is a licensed version. So, you can try the demo version to read and preview the entire restored data. But in case if users need data then, you have to buy the licensed version.
Additionally, this application compatible with all editions of Windows OS. So, do not wait for more to make a situation better. Instead, please check this utility to recover formatted data from the computer by visiting our official page.
Here, in this segment, I will tell you few easy steps to recover formatted data from a laptop. Users have to go all to execute the recovery process suitably:
Now, choose the Formatted scan option from the provided options
Here, you can preview the all restored data in the software panel
Finally, users can save restored data from any location according to your pc
Tips to Secure SSD Drive From Data Loss Issues
After restoring lost or damaged data from the SSD drive, it is better to learn how to prevent your data from a further data loss problem. In this segment, I am going to tell few following helpful tactics to avoid data loss disasters:
Prevent Overwritten Data
When users find any types of data loss difficulty on their SSD drive, so, instantly stop using that because the computer memory does not recover any trace of its last state when it is overwritten.
Always Take Computer Data Backup
A user should have to back up their critical data to an external device to prevent future uncertainty. Because, after formatting the drive, there is one free solution left to recover lost data from the laptop.
Run An Appropriate Anti-Virus Program
Download and launch any trustworthy anti-virus software to scan or remove viruses, worms, and bugs from the solid-stated drive. It will help to avoid any future incidences.
Summing Up
Frequently, Multiple users need a reliable solution to recover formatted data from the computer. But, there is no free method to resolve this problem at any cost. There is only one mode, i.e., a third-party tool named SSD Recovery Tool. With the help of this application, a user can recover their formatted data from an SSD drive without any hindrance. This utility assists the ultimate practicality that I already mentioned in the above section. So, it’s high time to take the decision wisely.